Posted by our guest blogger Kristen Beer from With a Grain of Salt.
Kitchen Science: Salt Dough Ornament Recipe
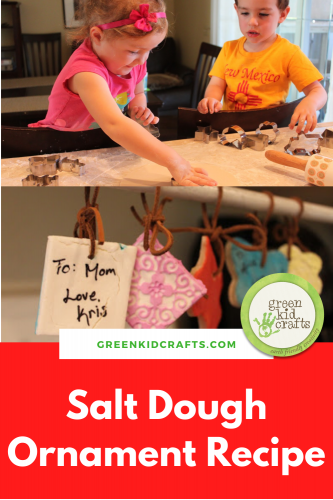
Looking for the Best Salt Dough Ornament Recipe? We compared two different popular recipes and found a winner! It’s amazing what you can do with minimal money, effort, and resources. This week, I compared two different recipes to make hand made gift tags. These recipes are usually used for preserving little people’s hand and footprints. Both recipes I used will work well for that, but I definitely have my preference. I used cookie cutters, clay imprint stamps, paint and sharpies, but this would be a great craft for stamps!
The first is your traditional Salt Dough:
Recipe:
1 cup flour (1 bag of flour $2.39)
1 cup salt (1 canister salt $.99)
1/2 cup of water
(well, in California, this is probably the most expensive ingredient, but you get the idea)
Directions:
Step 1: Mix it all up in a bowl and knead it, adding more flour if it sticks to your hands.
Step 2: Roll out to 1/4 in on a floured surface and either make your hand/foot prints or use your cookie cutters and stamps.

Step 3: Bake at 200F for 3 hours, flipping once half way through.
Step 4: Paint! We used watercolors to paint them after they cooled, but I think painting them before the bake is the way to go.

I plan on using pretty sharpies to write the “to and froms” on the front. My precious angel baby refused to take part in any decorating, coloring, painting, or other personalization of the shapes we cut out, but YOUR young artist may appreciate the chance to put his or her own special touch on the gifts they give.
The second recipe was a new one for me. The website I got the idea from actually calls it “Better than Salt Dough Clay” because IT IS!
Baking Soda Clay Recipe
1/2 cup Cornstarch ($1.99)
1 cup baking soda ($.78)
3/4 cup water

Directions:
Step 1: In a pot over medium heat, stir constantly till all ingredients are incorporated and the mixture is smooth like mashed potatoes. I kept stirring it for as long as I could to get as much moisture out as possible.
Step 2: Transfer to a bowl and cover with saran wrap to let it cool. Once the temperature is comfortable to touch, begin kneading, adding cornstarch as you go if it is too wet. If it’s sticking to your fingers, it’s too wet.
Step 3: Roll it out to 1/4 inch on a corn starched surface and cut out your shapes. I used craft stamps after this step for a pretty scroll effect.

Step 4: Paint! And don’t forget to poke your holes for the ribbon. Bake for 2 hours at 175, flipping once halfway through. I’m pretty sure mine cracked because I forgot the holes and poked them at the halfway point when I flipped them.
The final product is a beautiful bright white with smooth surfaces and clean edges. So pretty!

For more DIY and eco-friendly projects, check out our blog!
Every month a different box! For kids ages 2-10+
With 4-6 activities each, our Boxes pack a punch!